A new homologous repair template must be designed and constructed for each genome modification.
Here are some sample designs to get you started, using the his-72 locus as an example.
For detailed cloning protocols, see the Protocols page or download our Construct Design and Cloning Guide.
Thanks to Chris Higgins, Mike Nonet and Ari Pani for helpful discussions about construct designs.
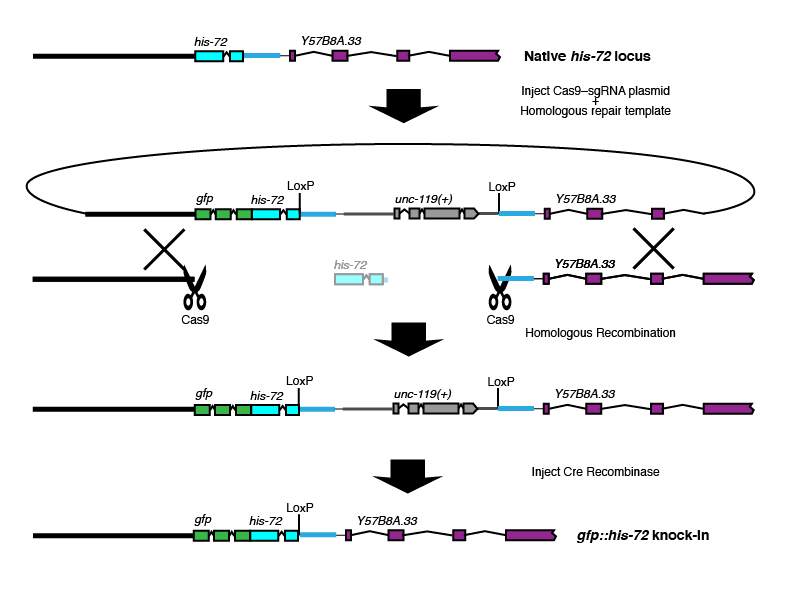
The original design described in our publication
Brief description: Basic design for introducing modifications at the 3' end of a gene of interest.
Example Sequence File: his-72_GFP repair.ape
Where Cas9 cuts: At or near the C-terminus of the gene of interest.
Where the selectable marker goes: In the intergenic region between the gene of interest and the next gene 3'.
Best choice for: C-terminal tags or modifications
Advantages:
- Simplest strategy, applicable to many kinds of modifications.
- Can look for fluorescence (or phenotype) immediately after isolating knock-ins, before injecting Cre.
- Thoroughly tested and very robust strategy; as of December 2013, 20/21 projects attempted in our lab have been successful (18/21 succeeded on the first try).
- Not well suited to N-terminal tags or modifications far from the 3' end of a gene.
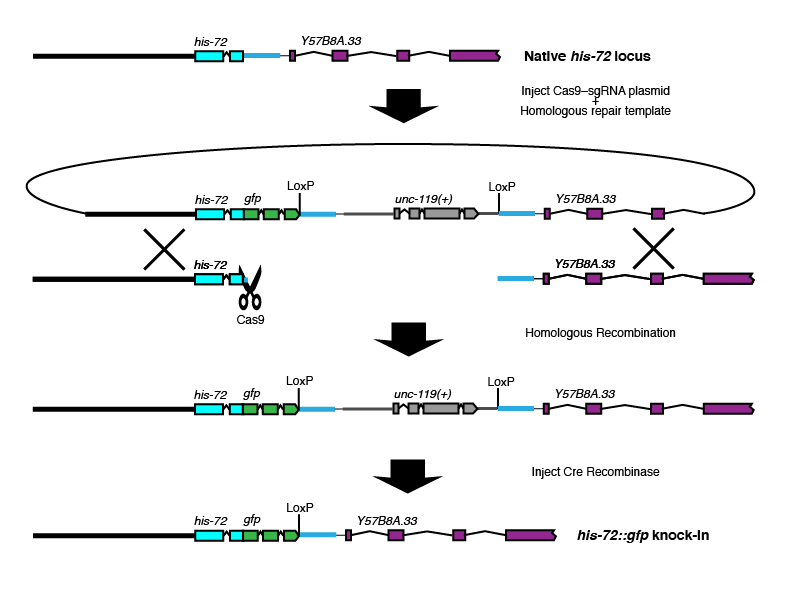
N-terminal "broken GFP" tag with selectable marker in GFP intron
Brief description: The unc-119(+) selectable marker is placed within an intron of GFP. The example here is for an N-terminal tag, but this approach would also work for a C-terminal tag.
Example Sequence File: Broken GFP_his-72 repair.ape
Where Cas9 cuts: At or near the N-terminus of the gene of interest.
Where the selectable marker goes: In a synthetic intron within the GFP coding sequence.
Best choice for: N-terminal tags on large or essential genes.
Advantages:
- This design is useful when the initial knock-in must be isolated as a heterozygote. Fluorescence is only observed after excision of the selectable maker, so after Cre injection one can screen by looking for GFP-positive animals.
- After selectable marker excision, no exogenous sequence is left behind except for insertion of the GFP.
- The broken GFP cassette containing the selectable marker can be amplified as a single PCR product, which simplifies cloning the repair template.
- We have used this strategy in our lab to N-terminally tag several endogenous genes. It works robustly as long as the gene of interest is expressed at high enough levels for GFP fluorescence to be visible.
- This strategy relies on being able to see GFP fluorescence from the knock-in on a dissecting microscope, so it may not work if your gene is expressed at low levels.
- GFP fluorescence is only observed after excision of the selectable marker. Although this makes screening much easier when injecting Cre into a heterozygous knock-in, it does mean that two injection steps are required to generate a tagged protein. You won't know whether your knock-in is bright enough to be useful until after the second injection step.
- Because the initial insertion behaves as a null, recombinants will have to be isolated and maintained as heterozygotes.
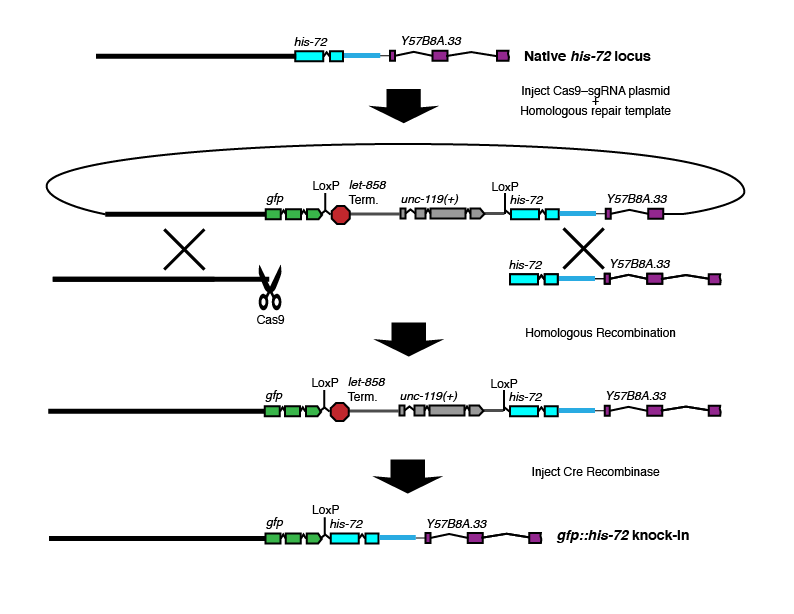
N-terminal tag with selectable marker in synthetic intron
Brief description: GFP and a selectable marker are inserted at the 5' end of the gene of interest to make an N-terminal tag.
Example Sequence File: GFP_unc-119_his-72 repair.ape
Where Cas9 cuts: At or near the N-terminus of the gene of interest.
Where the selectable marker goes: In a synthetic intron between the GFP and the N-terminus of the gene of interest.
Best choice for: N-terminal tags on non-essential genes, especially when you are interested in assaying promoter activity.
Advantages:
- This deign kills two birds with one stone: The initial insertion behaves as a null mutant expressing a promoter::GFP fusion (i.e., a gene replacement). This is converted into a translational fusion after Cre injection.
- After selectable marker excision, no exogenous sequence is left behind except for insertion of the GFP.
- Two injection steps are required to generate a tagged protein (because the first step produces a promoter fusion; see below for a design that generates a translational fusion in a single step).
- Since the initial insertion behaves as a null, recombinants will have to be isolated and maintained as heterozygotes if the gene of interest is essential. Isolating heterozygotes is not difficult using unc-119 selection, but Cre-mediated excision of the selectable marker from a heterozygous strain can be very challenging. Therefore, for essential genes we recommend using one of the designs below instead.
- We are still in the process of testing this strategy in our lab (preliminary results indicate that it works). If you try it and find that it works (or doesn't work), please tell us.
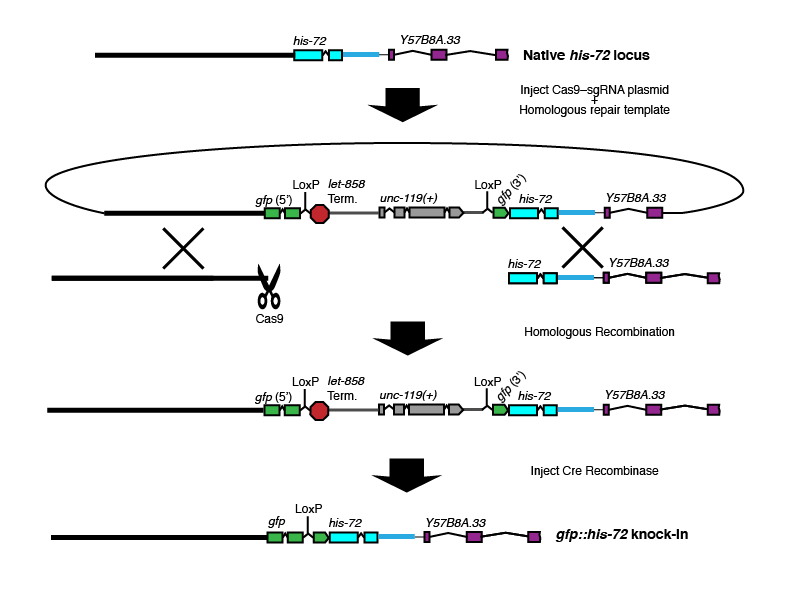
Whole-gene replacement
Brief description: The genomic DNA is cut twice by Cas9, and the entire coding region is replaced.
Example Sequence File: GFP_his-72 two-cut repair.ape
Where Cas9 cuts: At or near both ends of the gene of interest.
Where the selectable marker goes: In the intergenic region between the gene of interest and the next gene 3'.
Best choice for: Point mutations or N-terminal tags on relatively small genes.
Advantages:
- This is the quickest and most straightforward way to get an N-terminal tag or to make point mutations near the N-terminus of a protein.
- Particularly convenient if you want to examine the localization or function of a GFP-tagged wild-type protein and also several mutants or variants, since the same basic design and Cas9-sgRNA plasmids can be used to produce the wild-type and mutant versions.
- Two Cas9-sgRNA plasmids are required. It is possible that needing to make two cuts to the genome simultaneously will reduce the efficiency somewhat, although we don't anticipate this being a serious issue.
- This approach requires cloning the entire coding region of a gene, which could become prohibitive for large genes.
- We are still in the process of testing this strategy in our lab. If you try it and find that it works (or doesn't work), please tell us.